How to Use Guided Access on iPhone and iPad: an Essential Parental Hack
Parental Guilt
Let’s face it, parents – we sometimes need our kids to be quiet and leave us alone. Trying to work from home while children are pestering us with their demands is driving us crazy. Unfortunately, it seems that the only path to parental peace is screen time. We surrender to “electronic babysitting” for the sake of convenience. To preserve our sanity.
We feel guilty but there seems to be no other choice.
Kids quickly figured out how to manipulate exhausted parents: they consciously sabotage our productivity, our rest, and our social life with an ugly “tech tantrum”. They deliberately torment us because they know: the more difficult they become, the more likely we are to surrender. Let’s drain the reserves of parental willpower and win the screens back!
Parents are left with 2 options:
Option 1: Don’t give the screens, suffer the tech tantrum, get nothing done, and have your nerves ripped to shreds;
OR
Option 2. Give the screens, and feel guilty for being a bad parent who allows digital addiction to melt your kids’ brains.
Great news – there is Option 3: constructive screen time. Not all screen time is created equal. Children can do something educational: there is zero parental guilt about math or reading on the iPad!
The problem is they switch to YouTube the moment we turn our backs.
That’s where the genius little hack of Guided Access comes in.
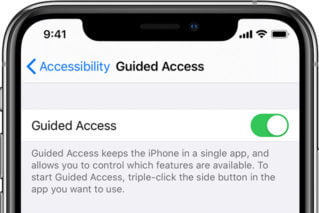
Guided Access is a feature in Apple’s device settings that keeps an iPhone or iPad on a single app.
Which means you can turn on Khan Academy for your child – and that’s the only thing they would be able to do.
How to Set up Guided Access
Settings > Accessibility > turn on Guided Access.
Passcode Settings > Set Guided Access Passcode > Enter a passcode, then re-enter it.
You can also turn on Face ID or Touch ID as a way to end a Guided Access session.
How to Start a Guided Access Session
- Open the app you want your child to use.
- For iPhone X or later, triple-click the side button. For iPhone 8 or earlier, triple-click the Home button.
- To have parts of your screen stop responding to touch, use one finger to circle those areas, move or resize the circle, or tap the X to remove it.
- Guided Access > Start.
- To turn off features or set a time limit, triple-click the Side or Home button, then tap Options. You may need to enter your passcode again.
- Sleep/Wake Button: allows to turn it off
- Volume Buttons: allows to turn them off
- Motion: allows to limit how your device responds to motion (screen won’t rotate if the device is turned)
- Keyboards: an option to turn off the keyboard
- Touch: an option to have the device ignore screen touches
- Dictionary: allow Look Up feature when text is selected
- Time Limit: set a time limit for your Guided Access session
Set up the options you need, then tap Done.
How to End a Guided Access session
Triple-click the Side or Home button > enter your Guided Access passcode > End. Or if you turned on Touch ID or Face ID for Guided Access, double-click the Side or Home button.
WOW – this is the holy grail of parental control for young kids. Activating on our phones right now. Thank you!